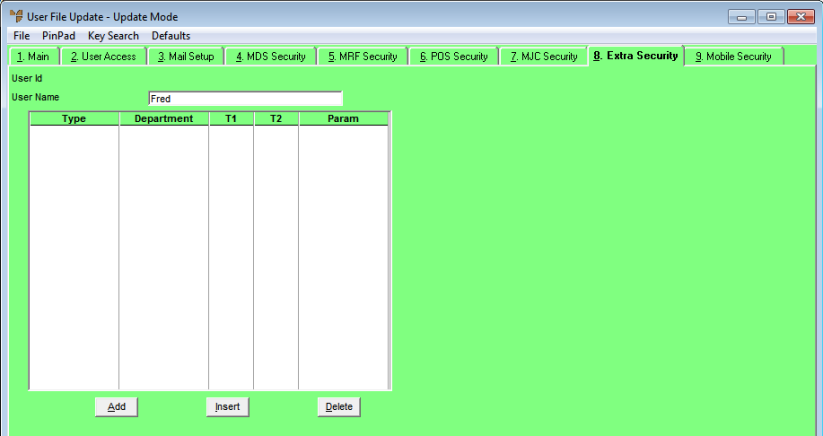
The User File Update screen – Extra Security tab is where you setup security for users of the Micronet General Ledger (MGL) and Micronet Creditors Ledger (MCL) systems. Where Departments or T accounts are being used, this sets a user's access to individual General Ledger departments or T accounts. If you don't complete this tab, the user will have access to all departments, T accounts or update functions.
Restrictions apply to General Ledger account inquiries, transaction processing and reports. You can also prevent users from updating or changing database information such as GL accounts, etc.
Refer to "Adding a New User" or "Updating a User".
Micronet displays the User File Update screen - Main tab.
You add the user's extra security details per security type.
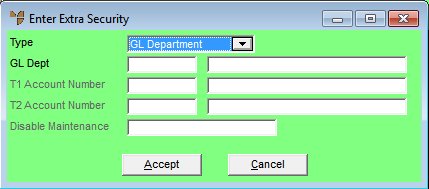
If you selected to add, insert or edit a security type, Micronet displays the Enter Extra Security screen.
|
|
Field |
Value |
|---|---|---|
|
|
Type |
Select the area or process where you want to setup a security function for the user. Options are:
|
|
|
GL Dept |
If you selected GL Department in the Type field, enter the GL department number that you want to restrict the user's access to. If no departments are entered, the user will have access to all GL departments. |
|
|
T1 Account Number |
If you selected GL T1/T2 in the Type field, enter the T1 account number that you want to restrict the user's access to. |
|
|
T2 Account Number |
If you selected GL T1/T2 in the Type field, enter the T2 account number that you want to restrict the user's access to. If you leave a T account field blank, the user can select all combinations relevant to that account. For example, if T1 = 001 and T2 = blank, the user can select all T2 accounts in the T1 account 001. If you do not select a T1/T2 account combination, or you pick a combination where both T1 and T2 are blank, then all T accounts can be selected. |
|
|
Disable Maintenance |
This field is displayed and enabled if you selected Partial Key Search in the Type field. Press the spacebar then press Enter to display a list of partial key search screens.
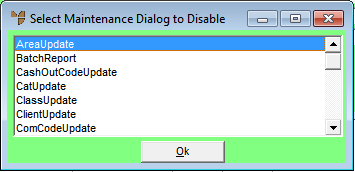
Select Maintenance Dialog to Disable If you want to disable the FILE | MAINTAIN option on a partial key search screen, select the appropriate screen name then select Ok. If this function is not disabled, users can add and maintain records through the relevant partial key search screen. For example, UpdateAccount allows users to make changes to GL accounts setup in the Chart of Accounts. |
|
|
Restrict Sales Territory |
2.8 Feature This field is displayed and enabled if you selected Restrict Debtor in the Type field. Enter the sales territory, or press spacebar then Enter to select a sales territory. This restricts the user to debtors who are in that sales territory. |
|
|
Restrict Debtor |
2.8 Feature This field is displayed and enabled if you selected Restrict Debtor in the Type field. Enter the debtor ID, or press spacebar then Enter to select a debtor. This restricts the user to that debtor. |
|
|
|
Warning Note that if you set both a territory in the Restrict Sales Territory field and a debtor in the Restrict Debtor field, users will be restricted from creating an invoice where the debtor has a central debtor applied, and the central debtor is not part of the (child) debtor's sales territory. For example, Debtor ABC123 is in sales territory VIC and has a central debtor, XYZ987. The central debtor is in sales territory NSW. If a user has Restrict Sales Territory set to VIC, they will be able to select Debtor ABC123 on an invoice but will not be able to process it as the central debtor is not in sales territory VIC. |
|
Max Disc |
Micronet 2.7 only This field is displayed and enabled if you selected Max Discount in the Type field. Enter the debtor ID to which the maximum discount applies for this user, or press spacebar then Enter to select a debtor. |
|
|
Restrict Warehouse |
2.8 Feature This field is displayed and enabled if you selected Restrict Warehouse in the Type field. Enter the ID of the warehouse you want to prevent the user from viewing or selecting, or press spacebar then Enter to select a warehouse. Note that where the other options on this screen allow the user to access the selected function, this option prevents the user from accessing the selected warehouse. |
|
|
|
Active Directory |
This field is displayed and enabled if you selected AD Account in the Type field. Enter the user's active directory user name. When the user enters their network login name and password, they will be automatically logged in to Micronet. |
|
|

|
Technical Tip You must also set the Auto Login with Network User field on the The User File Update screen - Main tab to Yes. Refer to "Maintenance - Edit UserIDs - 1. Main". |
Micronet redisplays the Enter Extra Security screen so you can setup another security type for this user.
Micronet redisplays the User File Update screen - Extra Security tab listing the security types you setup for the user. These are the security departments, account or functions the user can access. However, if you have setup warehouse restrictions, these are the warehouses the user can't access.
|
|

|
Warning The restrictions to the user's access will not take effect until the next time they log in. |